Develop assignments
Develop assignments
We use gradle and eclipse to develop assignments for Graja. A packed assignment that can be used by a professor / lecturer consists of a ProFormA zip file. The zip file must have a specific internal structure specified by the ProFormA format. In order to reach that structure, you may use the sample eclipse project and the gradle build script provided with the distribution (${graja.home}/devasgmt/SampleGrajaAssignments.zip).
The settings needed to create a deliverable assignment that can be used with Graja are specified in various files in the assignment’s gradle project. When developing an assignment, a task.xml file has to be created that contains macros. The macros are filled automatically during build.
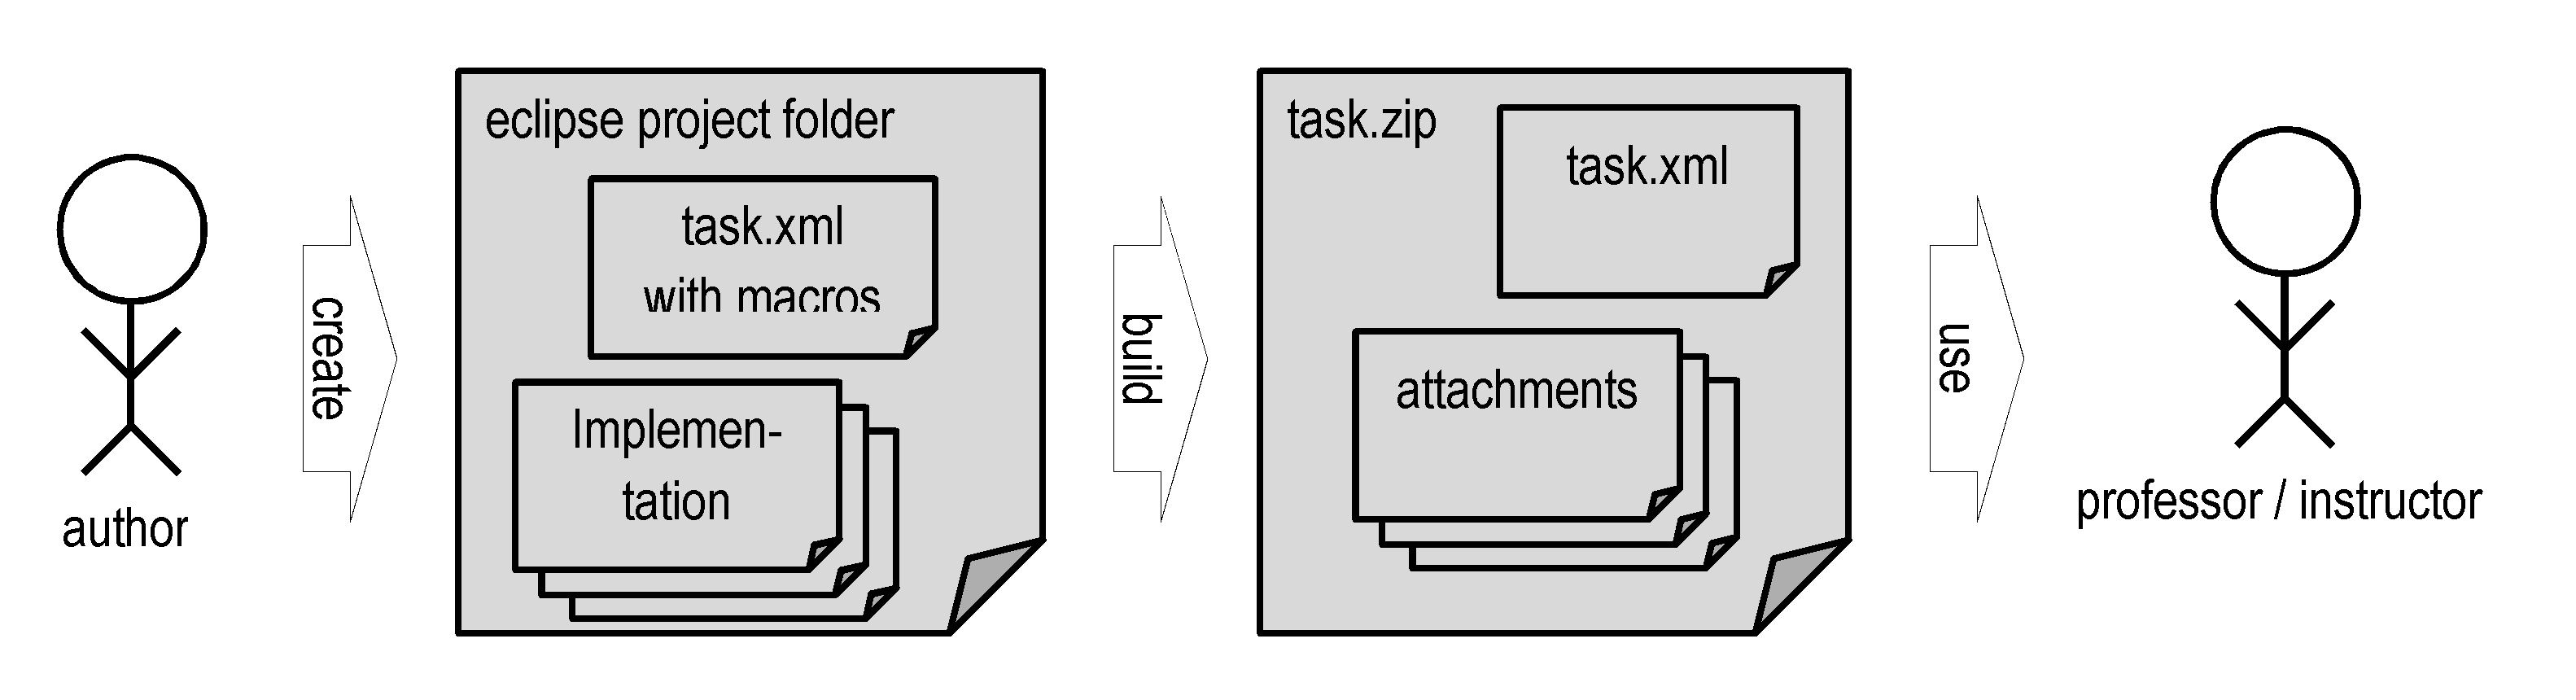
The following image illustrates that an author or developer of an assignment starts with a task.xml containing macros and with several implementation and configuration files in an eclipse project. The implementation usually consists of a JUnit test driver, a sample solution, a pmd rule file, a checkstyle configuration file, and maybe even more configuration files. When the author has finished his work, he want’s to deliver the assignment to a professor or lecturer, so that he can use the assignment. Therefore the author “builds” the assignment, which creates a ProFormA compatible zip-File, the so called “task.zip” file.
Sample eclipse project
Graja comes with a sample project “SampleGrajaAssignments” that can be used to develop assignment graders. In a single project you can develop many assignments. The project comes with a Gradle builder that builds the deliverables above, namely a task.zip. The sample project helps you to not repeat yourself in that it defines e.g. default settings that hold for all your assignments at a single location. Each assignment in that project gets a unique label - we call it a “token”. The token is the fully qualified package name, where your grader code lives. Each assignment’s sources are organized in a predefined structure, which is documented in detail in a README.txt file in the SampleGrajaAssignments project.
The README.txt file inside the sample project also contains additional information on how to configure eclipse to successfully build the project. The sample project references the local Graja installation, i. e. you must install Graja on the development computer.
Task.xml with macros
Every assignment starts with a task.xml file containing macros. The macros help in attaching files to the task.zip coming from various locations. Also the macros help by auto-generating files and model solution elements from all sample solutions in a specific subfolder of the assignment’s project.
Examples of task.xml files with macros can be found in the SampleGrajaAssignments example project.
A typical task.xml macro file is shown below:
<?xml version="1.0" ?>
<p:task #MACRO#(XML_NAMESPACES) #MACRO#(TASK_UUID) #MACRO#(LANG)>
  <p:title ...>
  #MACRO#(DESCRIPTION)
  #MACRO#(INTERNAL_DESCRIPTION)
  #MACRO#(PROGLANG)
  <p:submission-restrictions ...>
  <p:files>
    #MACRO#(JUNITJAR_FILE)
    <p:file id="pmdcfg" used-by-grader="true" visible="no">
      <p:attached-txt-file encoding="UTF-8">
        #MACRO#(FILE_FROM_PROJECT_DIR | SRC=src/attachment/resources/ruleset1.xml)
      </p:attached-txt-file>
    </p:file>
    <p:file id="checkstylecfg" used-by-grader="true" visible="no">
      <p:attached-txt-file encoding="UTF-8">
        #MACRO#(FILE_FROM_PROJECT_DIR | SRC=src/attachment/resources/HshCheckstyleConfig.xml)
      </p:attached-txt-file>
    </p:file>
    <p:file id="javatypesel" used-by-grader="true" visible="no">
      <p:embedded-txt-file filename="javatypesel">
        include-package=...
        exclude-type=...
      </p:embedded-txt-file>
    </p:file>
    #MACRO#(POLICY_FILE)
    #MACRO#(MODEL_SOLUTION_FILES)
  </p:files>
  #MACRO#(MODEL_SOLUTIONS)
  <p:tests>
    <p:test id="compile">
      <p:title>Compilation</p:title>
      <p:test-type>java-compilation</p:test-type>
      <p:test-configuration/>
    </p:test>
    <p:test id="junit">
      <p:title>JUnit dynamic analysis</p:title>
      <p:test-type>unittest</p:test-type>
      <p:test-configuration>
        <p:filerefs>
          <p:fileref refid="junitjar"/>
          <p:fileref refid="policy"/>
          <p:fileref refid="javatypesel"/>
        </p:filerefs>
        <u:unittest framework="junit" version="4 with Graja customizations">
          <u:entry-point>#MACRO#(ASSIGNMENT_NAME).grader.Grader</u:entry-point>
        </u:unittest>
        <e:computingResources>
          <e:maxRuntimeSecondsWallclockTime>30</e:maxRuntimeSecondsWallclockTime>
          <e:maxDiscQuotaKib>1000</e:maxDiscQuotaKib>
          <e:maxMemMib>96</e:maxMemMib>
        </e:computingResources>
        <e:systemLocale defaultLocale="de-DE"/>
      </p:test-configuration>
    </p:test>
    <p:test id="pmd">
      <p:title>PMD static analysis</p:title>
      <p:test-type>java-pmd</p:test-type>
      <p:test-configuration>
        <p:filerefs>
          <p:fileref refid="pmdcfg"/>
          <p:fileref refid="javatypesel"/>
        </p:filerefs>
      </p:test-configuration>
    </p:test>
    <p:test id="checkstyle">
      <p:title>Checkstyle static analysis</p:title>
      <p:test-type>java-checkstyle</p:test-type>
      <p:test-configuration>
        <p:filerefs>
          <p:fileref refid="checkstylecfg"/>
          <p:fileref refid="javatypesel"/>
        </p:filerefs>
      </p:test-configuration>
    </p:test>
    <p:test id="human">
      <p:title>Manually assigned scores</p:title>
      <p:test-type>graja-human</p:test-type>
      <p:test-configuration></p:test-configuration>
    </p:test>
  </p:tests>
  <p:grading-hints ...>
  #MACRO#(META_DATA)
</p:task>
Markdown Files description.md and gradinghints.md
An assignment developer should create two markdown files, which can be used to display more information to the students and tutors.
These files are named description.md and gradinghints.md, and should be located in the main ‘grader’ directory of the assignment.
During the assignment build process the Markdown files will be converted to HTML by Pandoc.
You may use Pandoc specific Markdown features like including images and inline LaTeX.
If you want to include images, please use the assignments’ attachments/images/ directory as the image location, as
this one is checked to decide if the Markdown files should be converted again.
The description.md file should contain a textual explanation of the tasks contained in the assignment.
A LMS may display this to the students. The converted content of description.md will be inserted at the #MACRO#(DESCRIPTION).
gradinghints.md should contain information, that helps the tutors correct or grade the submitted solutions. The converted content of gradinghints.md will be inserted at the #MACRO#(INTERNAL_DESCRIPTION).
It is also possible to provide a description.default.md. The description.default.md is also converted by the build process. The resulting HTML of the default description is appended to the assignments description. This can be used to generate a common footer below all assignments’ descriptions.
assignment.properties and gradle.properties
When building the assignment org.example (the token), then the SampleGrajaAssignments build process will load properties found in SampleGrajaAssignments/src/org/example/grader/assignment.properties, in SampleGrajaAssignments/gradle.properties and in %userhome%/.gradle/gradle.properties.
In the file assignment.properties you can define a scoreMax value. If this value is specified, then during the generation of the ProFormA task the grading scheme will be scaled to reach the specified maximum score. The scaling process will also modify nullify conditions to match referenced scaled operand values at inner nodes of the scaled grading scheme. If the scoreMax value is missing, no scaling will happen. The value scoreMax can not be defined in the general gradle.properties file.
Instead, the following properties can be set in SampleGrajaAssignments/gradle.properties and these properties can be overridden by assignment specific values in e. g. SampleGrajaAssignments/src/org/example/grader/assignment.properties:
- proformaGrajaVersionCompatibility (e. g. 2.0.0)
- proformaJavaVersion (e. g. 8)
- proformaLanguage (e. g. en)
These values are included automatically with the macros #MACRO#(META_DATA), #MACRO#(PROGLANG), #MACRO#(LANG).
policy
A policy file defines a java security policy. This file maps to a File in the ProFormA format. It is possible to provide a default file at SampleGrajaAssignments/src/policy. These security grants are included with all assignments of the project.
File attachments
Files to be included in the task.zip should be inserted as shown in the example above using one of the macros #MACRO#(FILE_FROM_PROJECT_DIR and #MACRO#(FILE_FROM_ASSIGNMENT_BASE_DIR. These macros take care, that all these files will be validated before creating the task.zip.
ModelSolution
A ProFormA formatted task includes one or several so-called model solutions. In the development environment, model solutions are called sample solutions. All sample solutions are expected below the folder samplesolutions. Every subfolder of samplesolutions is considered a separate solution. The subfolder names will be mapped by the automatic build process to the ProFormA’s ModelSolution.id attribute. If there is a HTML file of the same basename as the subfolder, then that HTML content is included as ProFormA’s ModelSolution.internalDescription attribute. The HTML file must not contain a full-blown HTML document with html and body tags.
Let us consider a single sample solution and it’s folder F. All files in F will be transferred to ProFormA’s TaskFileType objects. If F contains more than one file, the build process automatically creates a zip file from F’s content. This will also happen, if F contains file(s) in subfolders. If there is a file F.html, the content is included as the internal description of that model solution.
ModelSolution Example
For example an assignment has the following sample solutions:
fibonacci
+- grader
   +- task.xml
   +- assignment.properties
   +- policy
   +- description.md
   +- gradinghints.md
   +- Grader.java
   +- samplesolutions
      +- correct
      |  +- Fibonacci.java
      +- correct.html    (contains the text 'Standard solution')
      +- wrong_subfolder
      |  +- fib
      |     +- Fibonacci.java
      +- wrong_subfolder.html  (contains the text 'Wrong solution')
Converter service
Graja provides converters to create requests and to consume results.
Convert a task.xml with macros to a task zip file
The SampleGrajaAssignment project uses Gradle imports to call a sophisticated assignmentBuild.gradle file, that will convert the task.xml macros and all referenced files to a task.zip format.
A typical assignments project has a one-liner build.gradle file:
apply from: "$grajaHome/devasgmt/assignmentBuild.gradle"
Convert a ProFormA task.zip to a RequestTO
You can convert an assignment in the ProFormA task.zip format to a RequestTO file. The converter uses the JVM’s default locale for submissionNaturalLanguage and makes simplifying assumptions about the requested rdKinds (= {INFO,SEVERE} x {TEACHER,STUDENT} x {html,plain}). The converter can be started by calling the command create_request on the Graja CLI.
Convert result to HTML
- The xml schema description used inside request.xml and result.xml can be viewed by calling command
query_graja_xsdon the Graja CLI.
The result received from CmdlineStarter can be converted to a HTML message by calling the command convert_result_to_html on the Graja CLI.
GUI
Below we will describe the Graja Gui client that is capable of converting task.zips to requests and of converting a XML or JSON result to HTML.
Creating a test class
The entry point to your assignment is the class in Grader.java (or a different class name). Here you must implement a usual JUnit test class that is annotated as follows:
@RunWith(GrajaRunner.class)
public class Grader  {
    @InjectContext public static GraderContext ctx;
    ...
The name of your class must be included in the task.xml in the JUnit test’s entry-point attribute. The ctx field will be injected by the GrajaRunner and can be used to access various utility methods of the Graja library.
In the sample project there are sample assignment graders. A Grader class acts as a JUnit test. It can have several instance methods annotated with @Test. Each test method will be executed by the GrajaRunner. If a test method fails (org.junit.Assert.fail(…)), the corresponding score (declared in the grading-hints section in the task.xml) won’t get awarded.
As usual in JUnit tests you may define methods that run @Before and @After any test and also methods that run once before all test (@BeforeClass) and once after all tests (@AfterClass).
When writing your grader, remember that all your Grader’s test methods may run concurrently and every test method gets its own Grader-instance.
A usual setup is as follows:
- In a @BeforeClass method one or more classes from the submission are loaded and stored in static attributes. You will use methods of the ctx object to lookup the class. If the lookup fails, the respective org.junit.Assert.fail call already was done by the Graja library.
-
In a @Test method you call a method of the submission class again by using the Graja library. Example:
Support.invokeStatic(submissionClass, String.class, "method", param1, param2, param3);This call may fail with a corresponding hint to the student, if the submitted class does not declare a matching method “method”. If the call succeeds, the returned value usually is checked against an expected result. A org.junit.Assert.assertEquals(…) call could be used to check the result.
- A different path is to compare the behaviour of the submitted classes and a sample solution. The classes of the sample solution must be programmed by you, the assignment grader author. The Graja library provides the class DiffHelper with the possibility to compare the two outputs (e. g. console output) and to throw an AssertionError, when a difference has been noticed. The Graja library produces a message with a detailed diff view of the expected and the observed output. The DiffHelper can be configured to normalize the two outputs before comparison takes place.
- For more details please have a look at the SampleGrajaAssignments project, where you can find a few example assignments.
The Grader class accepts the following annotation at the method level:
- @Test specifies, that this is a test method which will be executed to grade the submission
It is possible to annotate a test class with @GrajaTestMethodSortOrder in order to specify the execution order of test methods.
Distribute the grading code among several classes
When your grader code is complex, it can be advantageous to split it into several classes. The test of type unittest in the task.xml can point to many grader classes in separate entry-point elements. The test classes are execute in order of appearence as entry-point elements.
Using the checkstyle module
The checkstyle module is based on a checkstyle configuration file as it is described elsewhere. Graja relies on the “metadata” extension feature of the checkstyle configuration. Every check configured in the configuration file can be annotated by these four metadata annotations:
<metadata name="de.hsh.graja.citeLinesBefore" value="..."/>
<metadata name="de.hsh.graja.citeLinesAfter" value="..."/>
<metadata name="de.hsh.graja.replaceTabs" value="..."/>
<metadata name="de.hsh.graja.maxReportsPerFile" value="..."/>
We explain all of these metadata:
- citeLinesBefore and citeLinesAfter must be integer values >= 0. Graja will cite a fragment of the submitted source, which contains the line of the check violation and a few lines before and after that line. If both values are 0, then only the erroneous line will be cited. Default values are: citeLinesBefore=2, citeLinesAfter=1.
- replaceTabs: if this is ‘true’ then the checkstyle module will print the source code fragment with tabs replaced by symbols. This is especially useful for checks like Indentation or FileTabCharacter. The default is false.
- maxReportsPerFile must be an integer >= 1. This is the maximum number of error messages reported by the Checkstyle module per source file. This could be useful for rules like FileTabCharacter, that are likely to produce one error per line. If this attribute is missing, the default value is Integer.MAX_VALUE
An example checkstyle configuration file is contained in the SampleGrajaAssignments project in the “…dateclassv01” assignment.
Testing a Grader
During grader development you will want to test your grader. As test cases you can anticipate one or more solutions of your assignments. You put these test cases in the “samplesolutions” subfolder below your grader’s code. There is a single subfolder below “samplesolutions” for every test case.
Submitting a test case using the GrajaGui
Now, how can you submit the test case to your Grader? For this, Graja comes with a little GUI client that lets you select the test case(s) to run and that shows the results on the screen. This client is the “GrajaGui” and can be started using the Graja CLI. The command is:
java --module-path /path/to/Graja;/path/to/Graja/extjar;/path/to/javafxsdk/lib --add-modules de.hsh.graja.gui --module de.hsh.graja/de.hsh.graja.Cli --command start_gui
For additional options try
java /path/to/javafxsdk/lib --add-modules de.hsh.graja.gui --module de.hsh.graja/de.hsh.graja.Cli --command start_gui --help
Another way to start the GrajaGui from an Eclipse IDE is to call the launcher “LaunchGui.launch” that is contained in the SampleGrajaAssignments project. See the README.txt file for more information. The client does not need to be configured on the command line. All configuration can be done in the dialog, that looks like this:
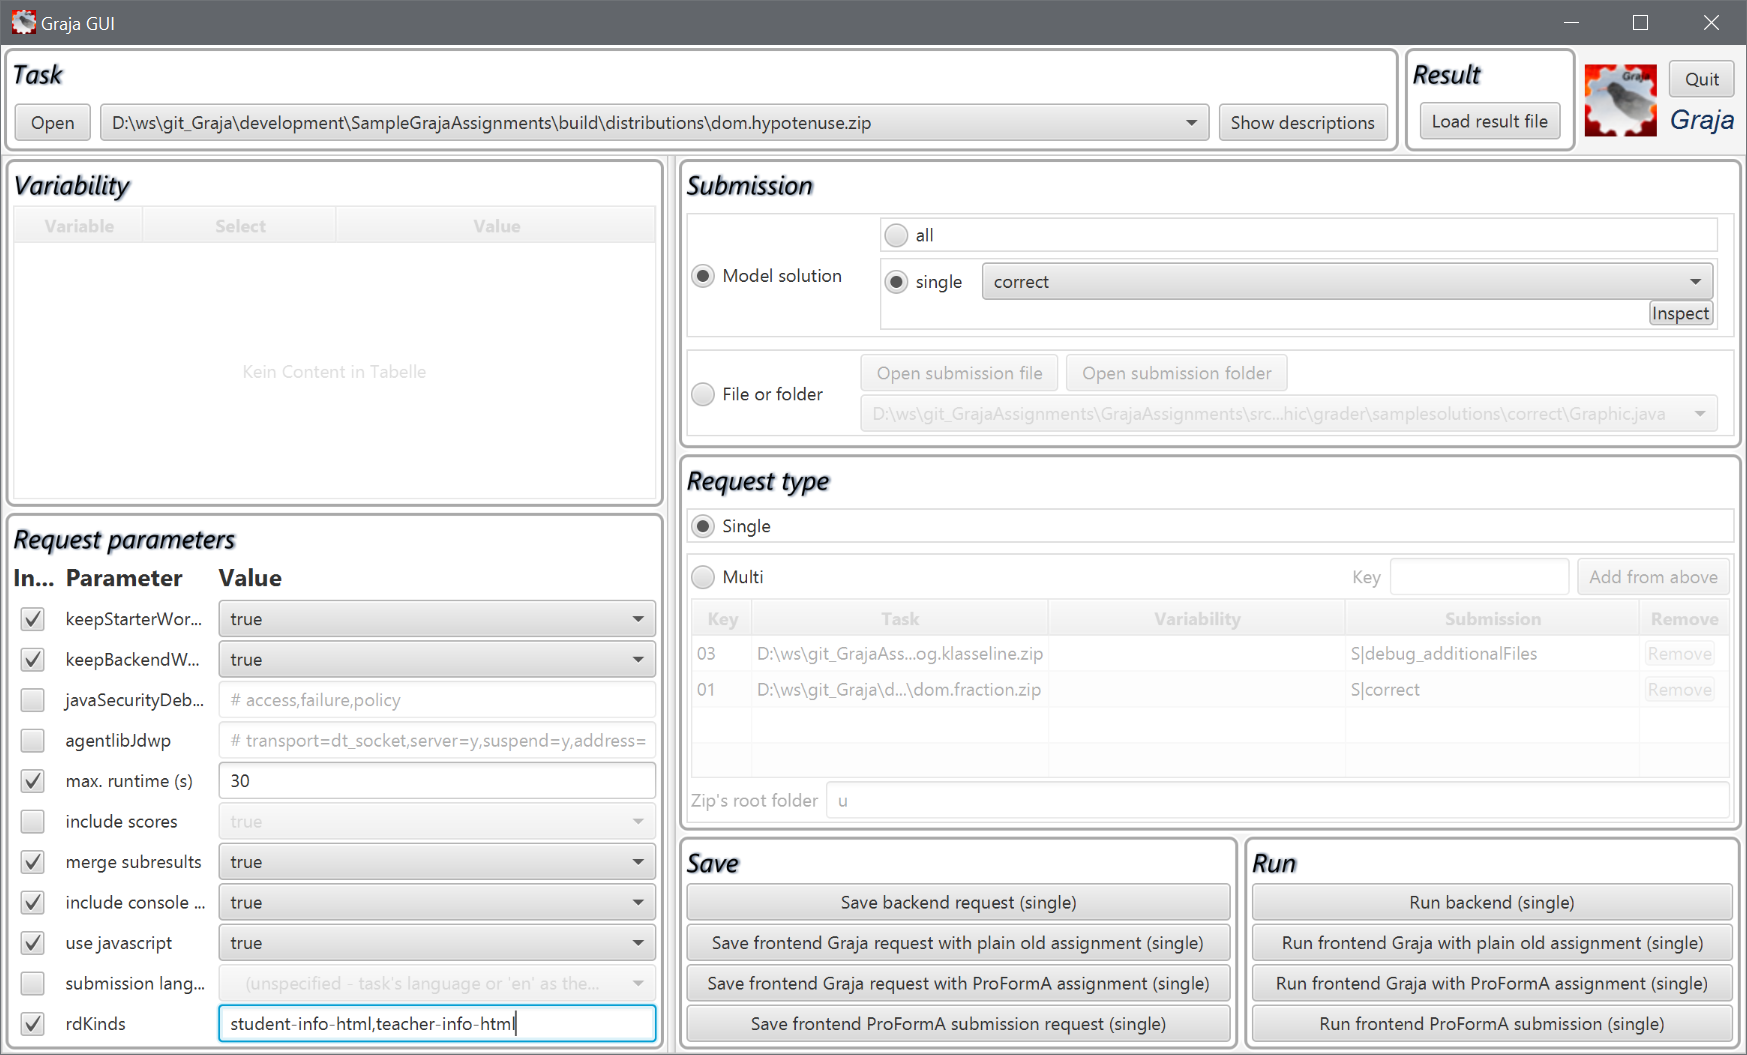
In the first line you select the ProFormA task file. Recently opened task files are available in a drop down.
On the right below “Submission” you can choose a sample solution (Model solution) as the submission. You can run a single sample solution or all at once. Also you can choose a file or folder from disk.
When pushing one of the “Run…” buttons in the lower right, the selected test case(s) get packaged in the background as a submission (possibly zipped) and passed to Graja. The results will pop up in a browser window.
Requests can be executed directly using one of the “Run …” buttons. Or they can be saved as a request file using the “Save …” buttons. Currently only two file formats (XML and JSON) are supported. A result file from Graja can be loaded using the “Load …” button. The result will be converted to a html document that will pop up after loading has finished.
Result documents
Graja is capable of producing detailed comments dedicated to the teacher or the student or both. The comments are passed back as several separate documents. For example Graja could produce the following four documents:
| audience=TEACHER | audience=STUDENT | |
|---|---|---|
| level=SEVERE | a document with error messages only, dedicated to the teacher | a document with error messages only, dedicated to the student. Usually this is as subset of the messages that the teachers receives. Sometimes the messages are reformulated in order to be more comprehensible to students. |
| level=INFO | a document with informational messages, dedicated to the teacher. In this document error messages are included, too. | a document with informational messages, dedicated to the student. In this document error messages are included, too. |
Every document can be delivered by Graja in one of two representations:
- a html document,
- a plain text.
Graja can be called with a list of desired documents. E. g. you could instruct Graja in a RequestTO object to deliver SEVERE documents only for students but INFO documents only for teachers. For testing purpose you can control the created documents in detail in the input field “rdKinds” at the lower left of the GUI.
Run in separate JVM
The button entitled “Run backend (…)” will grade the test case inside the same JVM. This makes debugging easier but prevents using the security policy from the assignment’s sources. The buttons “Run … frontend” run Graja in a separate JVM and configure that JVM with the security policy specified in the associated assignments. This makes it possible to test security issues.
Preferences of the GrajaGui
The GUI client stores the last input in a file .grajagui.xml below the user home directory. That way, for ongoing tests of a single assignment you don’t have to enter the same data over and over again.
Graja library
TODO: describe the library
Mocking
TODO: describe MockitoWrap